The Cuckoo Sandbox is an automated malware analysis sandbox where malware can be safely run to study its behavior. The benefits of setting up a Cuckoo Sandbox is immense. Having a private and an open source malware sandbox means that you can run any suspicious file without worrying about sensitive data being leaked to a public forum such as VirusTotal. Plus, this malware sandbox can be tailored toward your business security needs and tools. This guide will provide you with a basic installed and configured Cuckoo Sandbox to begin dynamically analyzing malware in a safe environment.
- Cuckoo Sandbox prerequisite software setup
- Preferred operating system for Cuckoo Sandbox is Linux: install the latest version of Ubuntu
- Complete a full machine update: sudo apt-get update && sudo apt-get dist-upgrade -y
- Software dependencies setup
- Install a bunch of Linux packages for software: sudo apt-get install python python-pip python-dev libffi-dev libssl-dev python-virtualenv python-setuptools libjpeg-dev zlib1g-dev swig mongodb libcap2-bin libfuzzy-dev virtualbox curl -y
- Install python installer package: pip install pip
- Install tcpdump, network sniffer tool:
- sudo apt-get install tcpdump apparmor-utils -y
- sudo aa-disable /usr/sbin/tcpdump
- sudo setcap cap_net_raw,cap_net_admin=eip /usr/sbin/tcpdump
- getcap /usr/sbin/tcpdump –> proper output from command: /usr/sbin/tcpdump = cap_net_admin,cap_net_raw+eip
- Install yara, open source malware signature tool:
- sudo apt-get install automake libtool make gcc flex bison
libjansson-dev libmagic-dev -y - wget https://github.com/VirusTotal/yara/tree/3.6/yara-3.6.zip
- mv yara-3.6.2.zip /home/<user>/
- unzip yara-3.6.zip
- cd yara-3.6.2
- ./bootstrap.sh
- ./configure –enable-cuckoo –enable-magic –enable-dotnet
- make
- sudo make install
- make check
- sudo pip install yara-python
- sudo apt-get install automake libtool make gcc flex bison
- Install ssdeep and pydeep, tools for piecewise hashes:
- sudo apt-get install ssdeep python-ssdeep -y
- sudo pip install pydeep
- Install the python PDF report software:
- sudo pip install “weasyprint==0.39”
- Cuckoo Sandbox software installation
- Set up file directories:
- sudo adduser cuckoo
- sudo usermod -a -G vboxusers cuckoo
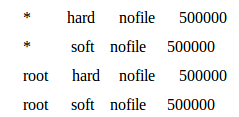
- Increase open file limit:
- sudo vim /etc/security/limits.conf
- paste this stuff below at the end of the file marker
- Set up python environment:
- install virtualenv
- . venv/bin/activate
- Download Cuckoo Sandbox software:
- sudo pip install -U pip setuptools
- sudo pip install -U cuckoo
- cuckoo -d
- cuckoo community
- Set up file directories:
- Guest machine setup (VM that runs the malware sample)
- Create a VM with an all-lowercase name in VirtualBox
- Install a windows 7×64 iso (recommended) or another operating system iso
- Download and install python 2.7.13
- Pip install Pillow
- Turn off everything for Windows Update, Windows Defender, and any software updates
- Turn UAC (User Access Control) to low
- Download any necessary software for testing (recommended Office 2013, Adobe Reader, Adobe Player, Java, Firefox)
- Set up networking:
- (VirtualBox console version before 5.1): in VirtualBox “Preferences” choose host-only networks and create new host-only network: vboxnet0
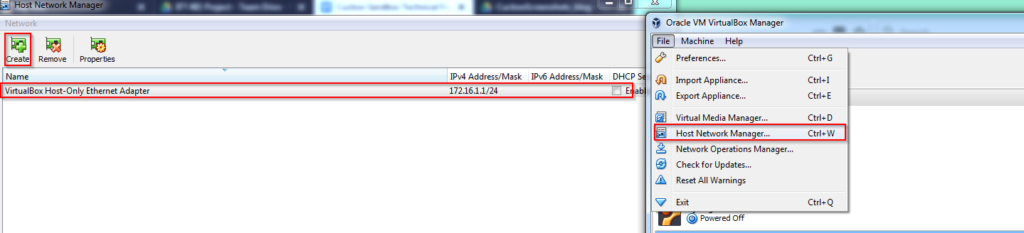
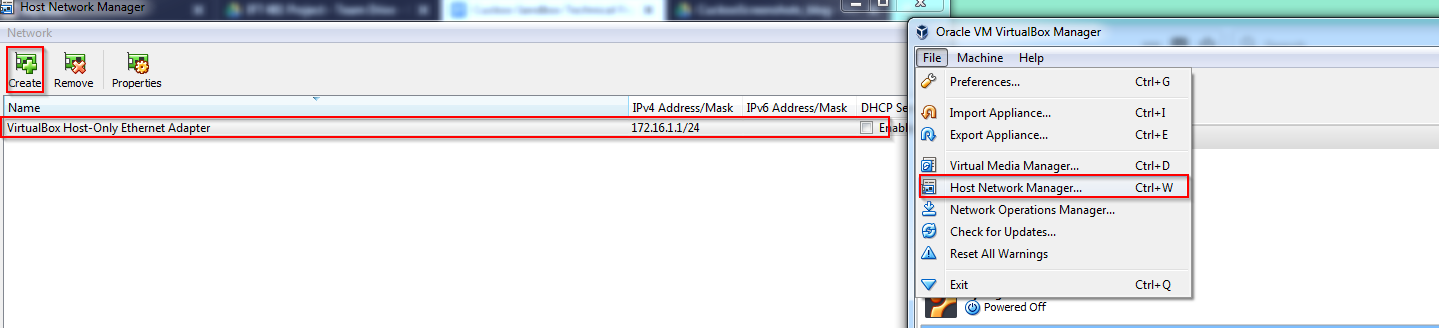
- (VirtualBox console version after 5.2): in VirtualBox “Host Network Manager” click on the create button and give the network name: vboxnet0
- Turn off DHCP Server in VirtualBox preferences on the checkbox
- Set a static IP address 192.168.56.101 in the VM
- Cuckoo Sandbox python agent, tool allowing Cuckoo and VM to talk:
- Move the agent into the guest machine (the setup of a sftp server is recommended for this operation- https://www.digitalocean.com/community/tutorials/how-to-enable-sftp-without-shell-access-on-ubuntu-16-04)
- Move the agent into the Windows startup folder
- Creation of VM snapshot (every ran analysis, Cuckoo Sandbox boots up a fresh VM):
- Start the VM
- Click on the ‘machine’ setting at the top and select ‘take snapshot’
- Cuckoo Sandbox configuration files setup
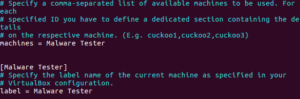
modify virtualbox.conf file:
nano .cuckoo/virtualbox.conf filechange machines = cuckoo1 to the name of guest machine’s name change header [cuckoo1] to the name of the guest machine; change label = cuckoo1 to the name of guest machine’s name
modify virtualbox.conf file:
change the IP = 192.168.56.101 if the guest machine does not use default IP address

modify reporting.conf file:
nano .cuckoo/reporting.config [mongodb], change enabled = no to yes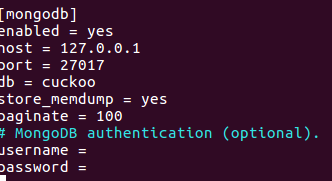
modify processing.conf:
nano .cuckoo/processing.config [screenshot] change enabled = no to yes
![]()
in [baseline] change enabled = no to yes
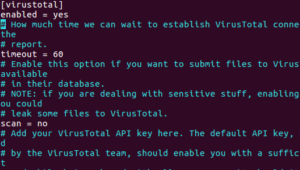
![]()
in [virustotal] change enabled no to yes
modify cuckoo.conf:
nano .cuckoo/cuckoo.conf change memory_dump = no to yes

modify auxiliary.conf:
nano .cuckoo/auxiliary.config in [services] change enabled = no to yes
For further resources on setting up Cuckoo Sandbox, please check out these links below:
Documentation: https://cuckoo.sh/docs/
Assistance: https://cuckoosandbox.org/discussion