So, you have decided to install a pentesting distro to enjoy functionality that would be unavailable on a live usb. The very first question that needs to be asked is “How do I keep myself secure?” In addition to some of the more obvious features of most pentesting distributions, such as full disk encryption, macchanger and anonsurf there are some lesser known ways in which to ensure your Operational Security. In 5 easy steps we will seek to automate some of the tediousness of making sure your make sure your box is secure.
Step 1: Disable root access to ssh:
Note: You can easily re-enable this if you ever happen to need it
$ nano /etc/ssh/sshd_config
Find the PermitRootLogin line, un-comment it and change the value to no
Step 2: Securely Wipe Memory, Free Space and Swapfile:
You will need to install secure delete for this step:
$ sudo apt-get install secure-delete
NOTE: When Editing the root users crontab you must su root or sudo -i ! sudo crontab -e does not work!
Step 2a: Automate Free Space Secure Wiping With Crontab:
$ sudo -i
$ crontab -e
Add: 0 0 * * *sfill /* to the root user’s crontab
This will wipe your free space daily at midnight.
Additional Crontab Reference can be found at:
https://www.cyberciti.biz/faq/how-do-i-add-jobs-to-cron-under-linux-or-unix-oses/
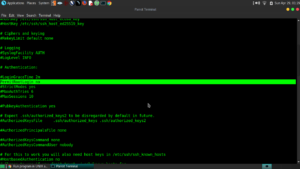
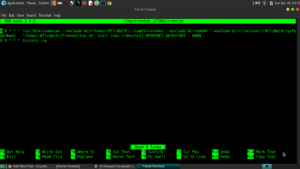
Step 2b: Add sswap and sdmem to the init.d scripts folder and make them run on shutdown and reboot:
Note: I used this template for the init script:
https://github.com/fhd/init-script-template
Here are my init scripts:
/etc/init.d/sdmem: https://pastebin.com/PAc919Xs
/etc/init.d/sswap: https://pastebin.com/0CTzfFF3
Note: The sswap command will need to be adjusted to your system.
After the init scripts are saved in /etc/init.d/ execute the following commands as root:
$ chmod 775 /etc/init.d/sdmem
$ chmod 775 /etc/init.d/sswap
$ update-rc.d sdmem defaults
$ update-rc.d sswap defaults
$ systemctl daemon-reload
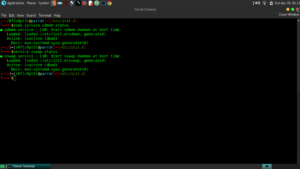
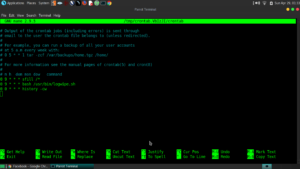
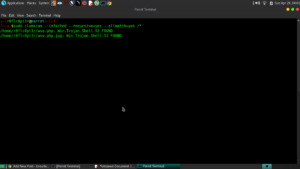
Step 3: Add a script to root user’s crontab to automate logfile deletion:
$ sudo -i
$ crontab -e
Add:
0 0 * * * /path/to/script.sh
I used the following script I found on https://serverfault.com/questions/185253/delete-all-of-var-log after googling the logrotate command’s usage.
Note: The logrotate command is normally the preference for logfile maintenance. More on logrotate can be found at: https://www.cyberciti.biz/faq/how-do-i-rotate-log-files/
#!/bin/sh
function goodbyelogs {
find /var/log -type f
}
for i in return $(goodbyelogs);
do sudo cat /dev/null > $i;
echo “Log $i has been cleared”;
done
And then I added it to the root user’s crontab as is pictured above.
Step 4: Effective .bash_history control:
The benefit of controlling bash history this way rather than setting the HISTFILE size to 0 is that you still can access previous bash commands during your session and it’s automatically cleaned.
Step 4a: Wipe .bash_history on reboot:
Add history -cw to both your user and root account’s crontab:
From a user account terminal:
$crontab -e
Add:
@reboot history -cw
For the root crontab:
$ sudo -i
$ crontab -e
Add:
@reboot history -cw
Step 4b: Delete .bash_history on Login also:
Add rm -f .bash_history to the bottom of both the root and user’s .profile file to delete the bash history on login. This is backup to the history -cw command that was added to crontab.
For a user account:
While in the user’s home directory:
$nano .profile
For root account:
$ sudo -i
$ nano .profile
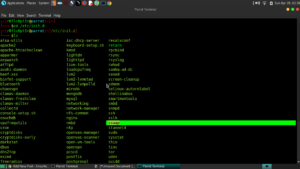
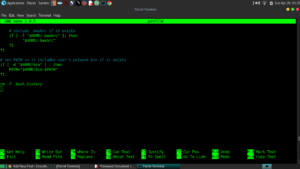
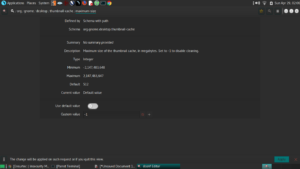
5: **Debian-based Distro Specific** Use dconf editor to disable “Recent Files” and thumbnail cacheing:’
Warning: Editing the Debian configuration file is potentially dangerous!
I use parrotOS MATE, I had history settings under Engrampa, Pluma and MATE (and a couple others). It took quite a lot of browsing before I found all of the locations that history file settings were in.
Once You locate them, change their value to 0 or -1 (as is appropriate) as in my screenshots:
Bonus Step: Add clamav and rkhunter to monitor for malware:
The Linux Operating System is far from immune to viruses, despite popular theory. As this post is geared specifically towards penetration testing, it is extra important that your Operational Security is not compromised because you did not protect yourself against malware and root-kits.
$ sudo apt-get install clamav* clamav-base-* rkhunter -y
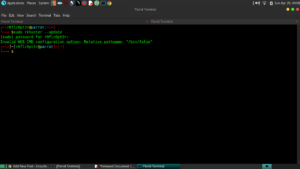
To run an a clamav scan, first you must update the signatures:
$ sudo freshclam
To scan with clamav:
$ sudo clamscan –infected –recursive=yes –all-match=yes /*
It seems I have some malware on my box. 🙂
To Scan with rkhunter:
$ sudo rkhunter -c
Note: I have not been able to update rkhunter via rkhunter –update it looks like i will have to edit the config file to make it work.
In conclusion, by these few simple steps, one can easily mitigate a vast amount of damage should their pentesting box be lost or compromised. As always, please combine these few simple steps with other best security practices as relates to penetration testing. Stay safe out there and always maintain good opsec.