This configuration tutorial is for an unroutable single forest domain. Unroutable domains are any top-level domains that cannot be used on the internet such as .local. The scenario is an on-premise Active Directory domain with a Forest Functional Level of Windows Server 20102 R2 that need seamless single-sign-on (SSO) for Microsoft 365 online resources such as SharePoint and Teams for better user experience and easier administration.
Part one will cover the installation and configuration of Azure AD Connect. Part two will cover the Group Policy settings needed for Chrome and Firefox to enable the use of Seamless SSO, and the process to see what is copied and matched from your on-premise Active Directory to Azure AD.
I had to visit more websites than I care to count to complete the Seamless SSO with password hash sync rollout. I will link, collect, and annotate everything you will need for this scenario in this series of articles. My hope is to save you time and frustration with this project.
You must have domain administrator permissions on the Domain Controller and Microsoft 365 to complete the actions in this tutorial. You must be running Windows Server 2012 or newer except for Server Essentials versions to use Azure AD Connect.
Warning: SSO’s weak point when it comes to security is the convenience of accessing multiple services with a single set of credentials. All of those services will be compromised if the password and username are disclosed. Choosing a strong passphrase and management is paramount. I recommend creating a passphrase using at least three unrelated words that are a minimum of four characters in length then add some complexity such a capital letter(s), a number(s), and a special character. The key is that the passphrase must be memorizable and changed only when confirmed as disclosed to reduce the management burden for employees. Go here for an excellent explanation of password strength in terms of entropy.
The first step is to add your routable email domain as an Alternative userPricipleName (UPN) suffix “@domain.com.”
- Open Active Directory Domains and Trusts (image 1)
- Right-click Active Directory Domains and Trusts and select Properties (image 2)
- Enter the routable domain in the Alternative UPN suffixes box then click add (image 3)
 Image 1


If you have accounts that don’t need to be synced to Azure AD create a new Organizational Unit (OU) for the users that have Microsoft 365 mailboxes. I named my OU Azure AD Connect Sync. Move the users with mailboxes to the new OU to make the next few steps smoother.
To create a new OU for the users you want to sync with Azure AD:
- Open Active Directory Users and Computers
- Right-click your local domain
- Hover your mouse over New
- Select Organizational Unit
- Enter the name you’ve chosen
- Make sure Protect container from accidental deletion is selected
- Click OK
If you have few users to move to the new OU:
- Right-click the user you want to move
- Select Move
- Select the OU you created for Azure AD sync
- Click OK
If you prefer to use PowerShell, you can use the PowerShell script below. Test the script on a small number of users (or test user accounts) to make sure it behaves as expected. I find it faster to use Control or Shift to select users to move to the new OU.
Move-ADObject -Identity "CN=First Last,CN=Users,DC=Domain,DC=Local" -TargetPath "OU=Azure AD,DC=Domain,DC=Local"Now you must change the UPN suffix for all of the users that have Microsoft 365 mailboxes in Active Directory. If you have few users then change the UPN suffix by hand is suitable. If you have a lot of users, there is a PowerShell script you can use to change the UPN suffix en masse.
To change the UPN suffixes individually:
- Open Active Directory Users and Computers
- Double-click a username to open Properties (you can also right-click the username and select Properties)
- Select the Account tab
- Select the drop-down box with the unroutable domain
- Select the routable domain from the UPN suffix list
- Click OK to save the change

To change the UPN suffixes en masse replace domain.local and domain.com in the PowerShell script below with your unroutable and routable domain respectively. If you need to select users based on OU, add -SearchBase $ou after Get-ADUser.
$LocalUsers = Get-ADUser -Filter "UserPrincipalName -like '*domain.local'" -Properties userPrincipalName -ResultSetSize $null
$LocalUsers | foreach {$newUpn = $_.UserPrincipalName.Replace("@domain.local","@domain.com"); $_ | Set-ADUser -UserPrincipalName $newUpn}
In either choice of how you change the UPN suffix, you must make sure that the username portion of the UPN matches the username of their email address. Azure AD Connect uses the UPN as the source anchor to match on-premise account to Azure AD accounts.
Go here to download Azure AD Connect.
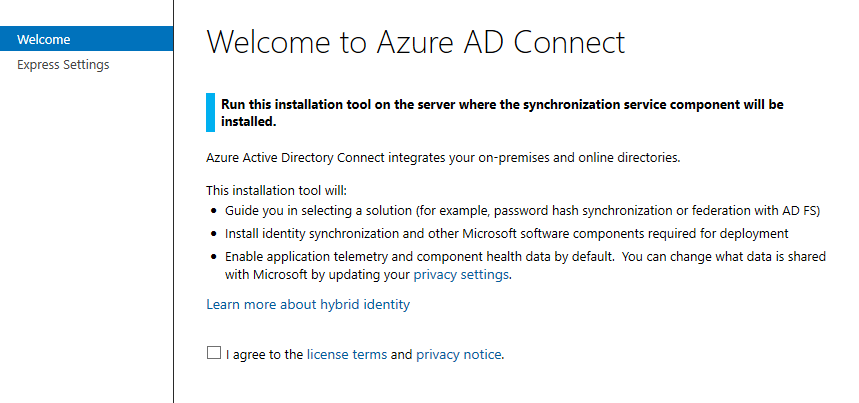
The first screen you’re met with when running the installer asks you to agree to license terms and the privacy notice. Check I agree then click Next.
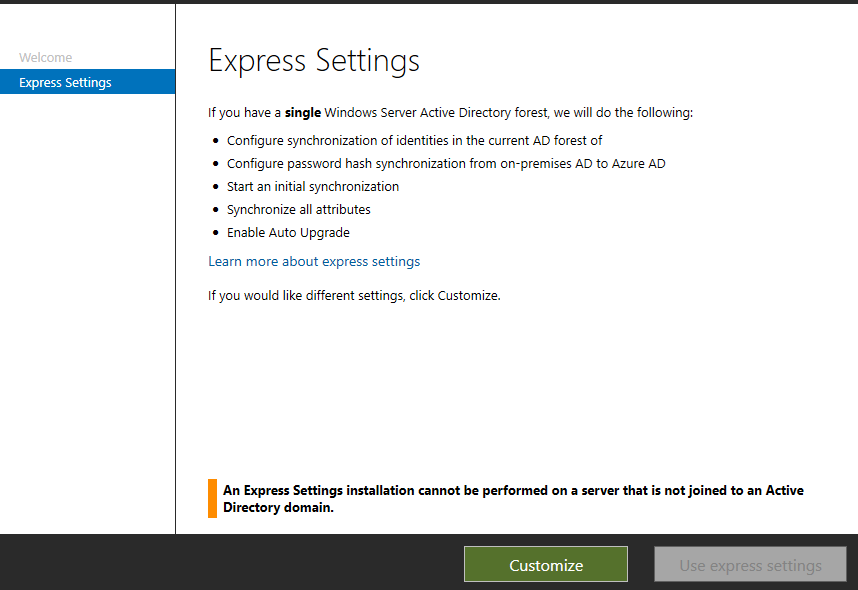
This screen is where you select Customize. Don’t use the express settings because we will not have the opportunity to test before going live with auto-synchronization.
You don’t need to make a selection for this screen unless your environment warrants one of the options. Click Install.
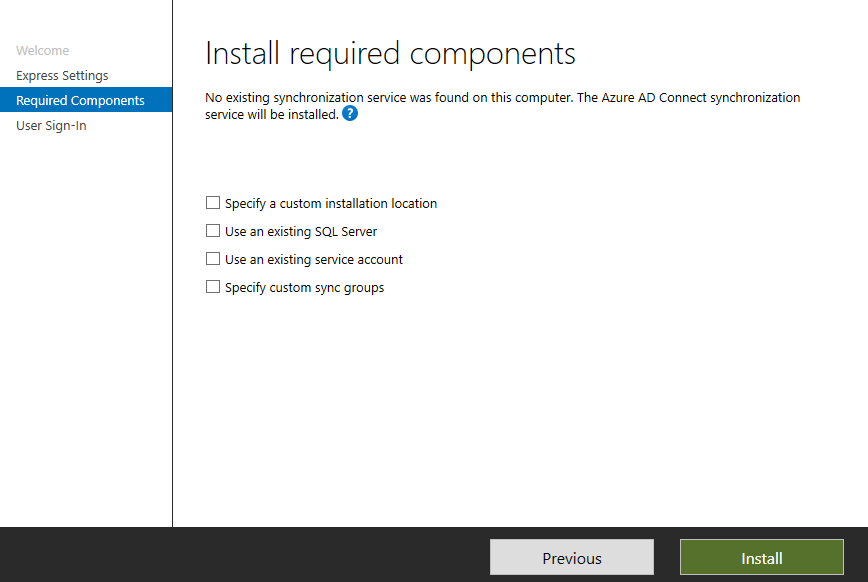
Microsoft SQL 2012 Express, Native Client, Command Line Utilities, Synchronization Service, and Microsoft Visual C++ 2013 Redistributable will be installed.
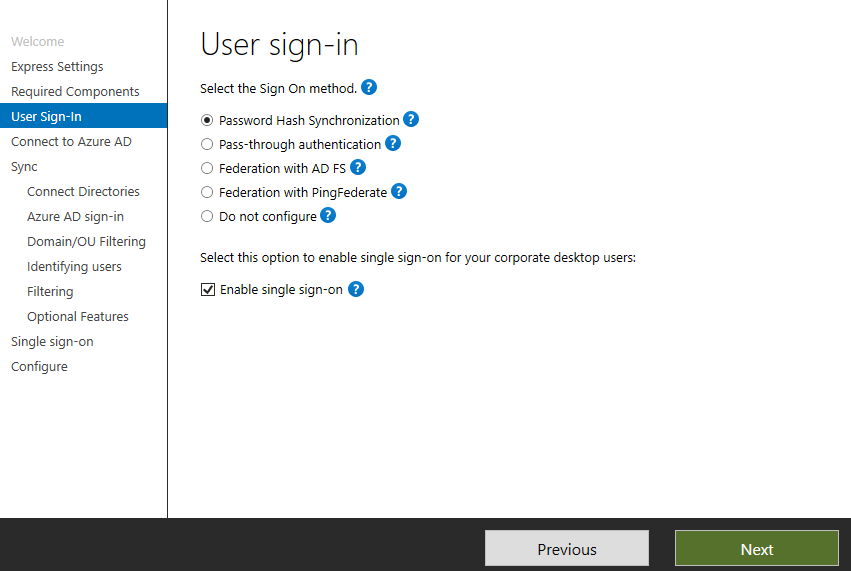
After installation, you’ll be met with the User Sign-In screen. Select Password Hash Synchronization and Enable single sign-on then click Next.
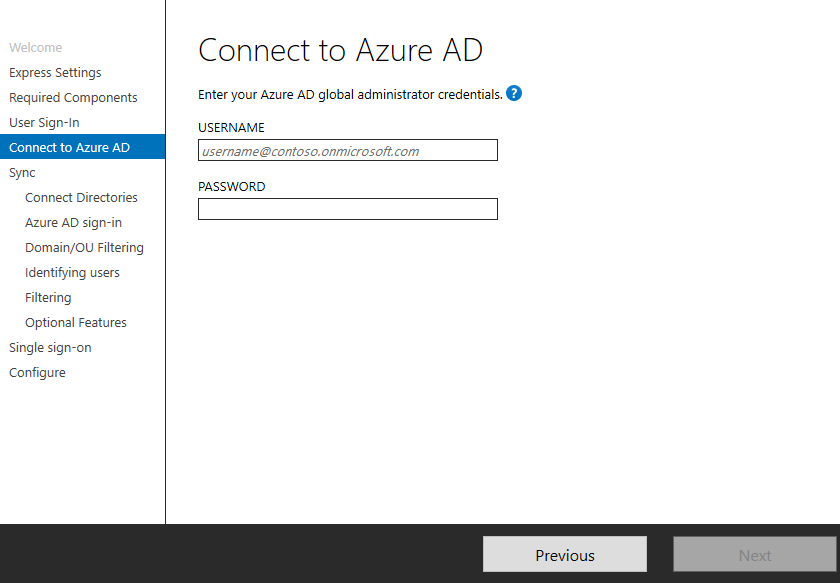
This screen is where we connect to our Azure AD tenant using global administrator credentials e.g., [email protected] then click Next.
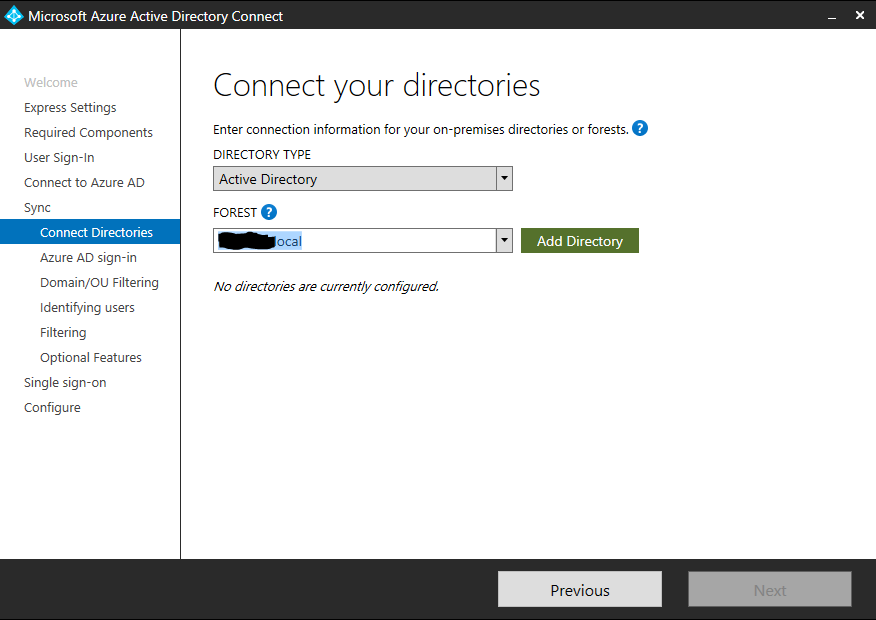
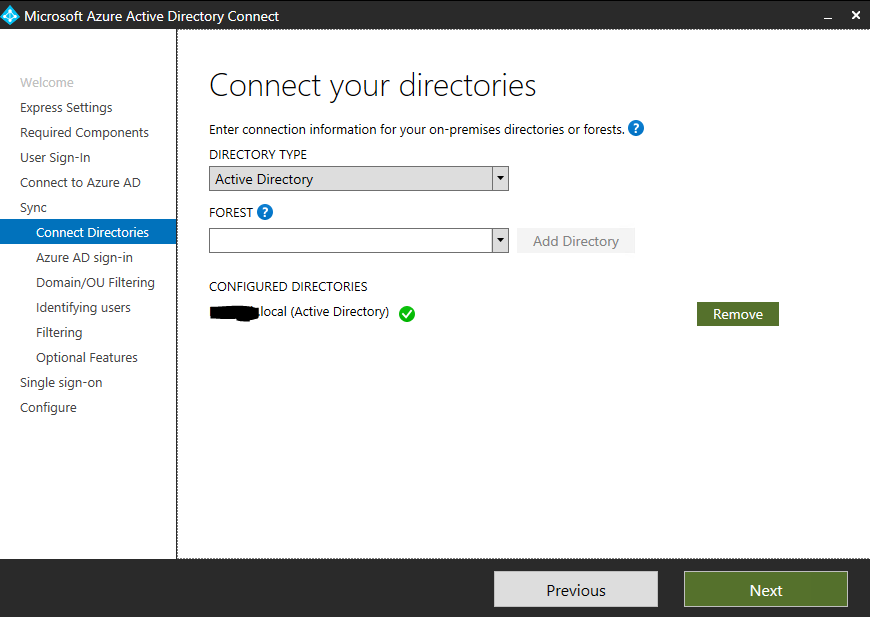
After signing in with the Microsoft 365 tenant administrator account you will connect your on-premise directory to Microsoft 365. Click Add Directory.
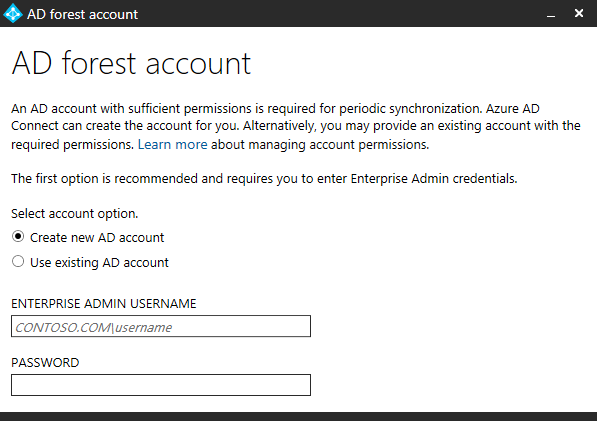
After clicking Add Directory you must supply Enterprise Admin credentials that have sufficient permissions to read and write to the on-premise Active Directory forest. Leave Create new AD account selected and use the Schema or Domain Admin account of your on-premises Active Directory. I used the domain\user format without the domain suffix. Click Next after clicking OK and the process for adding the directory is finished.
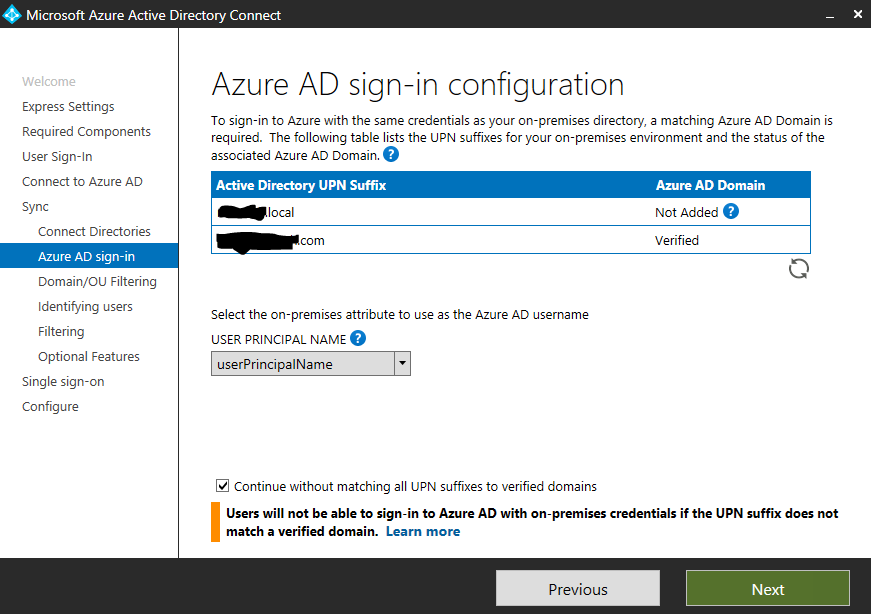
Now you’ll see an Azure AD sign-in configuration screen where you’ll select your attribute used to sign-in to Microsoft 365. Since you’ve aligned the username portion of the UPN in your on-premise Active Directory you should leave the UPN selected. Your unroutable UPN suffix for your on-premise Active Directory can’t sync with Azure. Select Continue without matching all UPN suffixes to verified domains at the bottom of the window. Click Next.
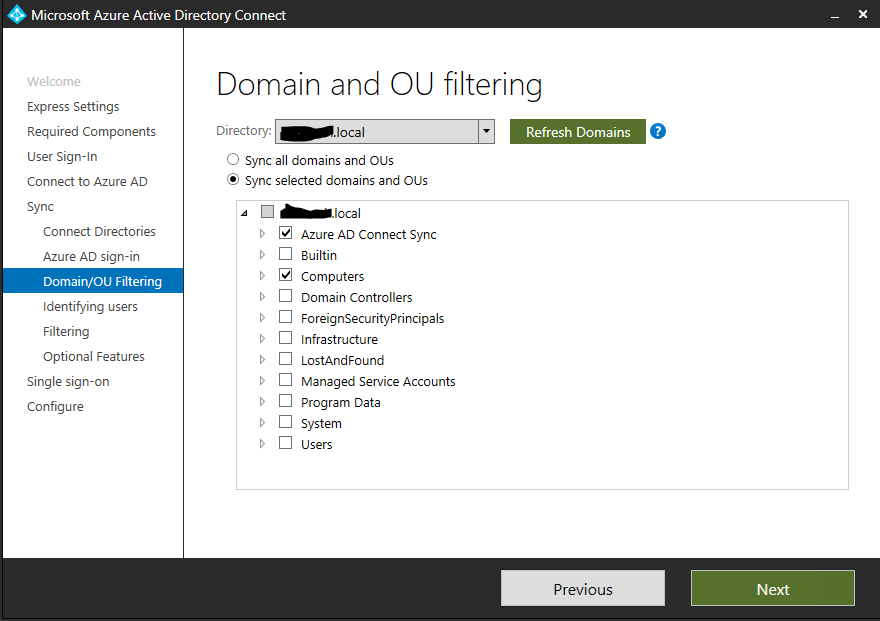
This next screen is where you’ll filter which on-premise Active Directory user objects will be matched with Azure AD user objects. Select Sync selected domains and OUs. Deselect all boxes except for the OU you created for Microsoft 365 mailboxes and Computers. Computers must be selected because Azure AD will create an object that is needed for reliable synchronizing. Click Next.
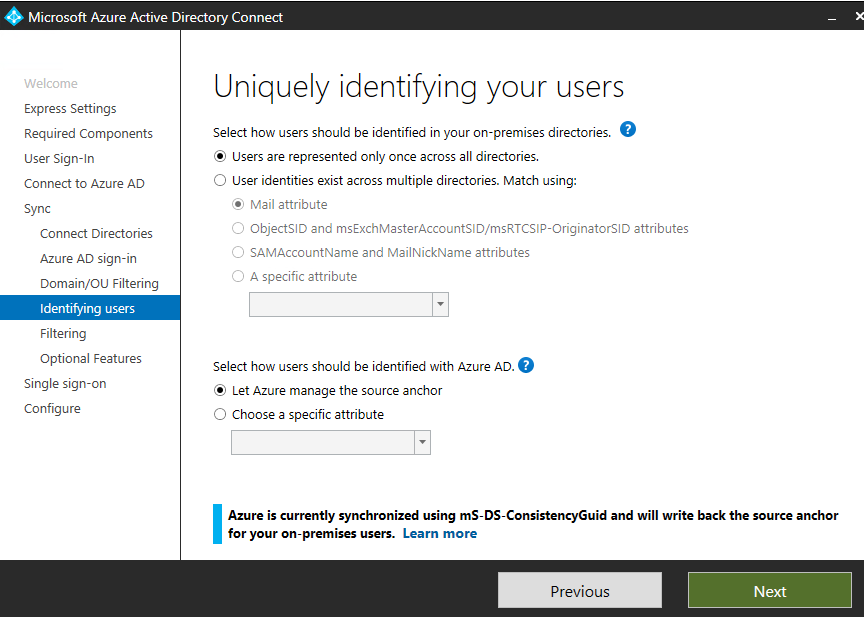
On the Uniquely identifying your user’s screen leave the default selections. Azure AD will use the mS-DS-ConsistencyGuid to match users by default (sourceAnchor). The mS-DS-ConsistencyGuid replaces the objectGUID in Azure AD Connect version 1.1.524.0 and later. The ConsistencyGuid is automatically configured during installation. Since this is a single forest, users are represented only once in our directory. If you want to dig into how accounts are hard and soft matched using the source Anchor go here.
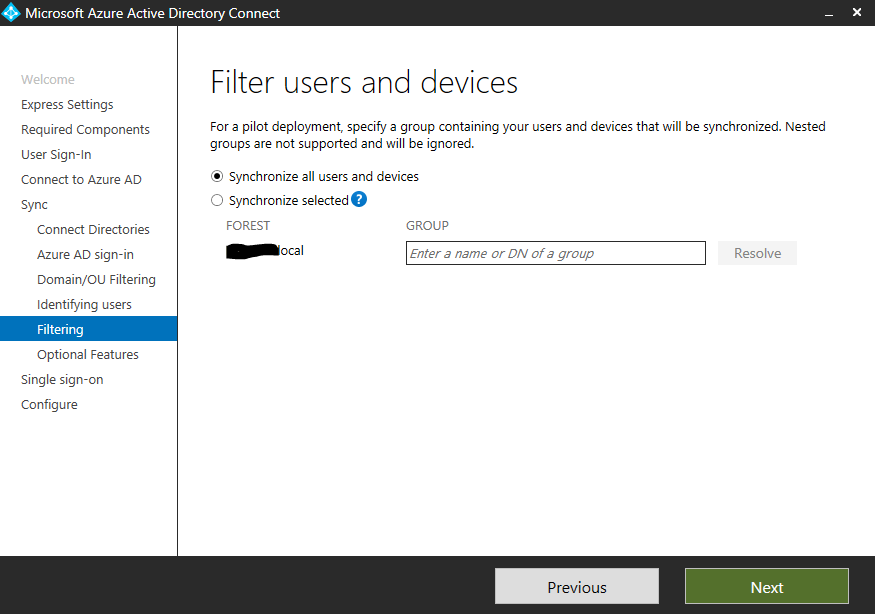
For the Filter user and devices screen, leave Synchronize all users and devices selected because we are filtering synchronized objects by OU. Click Next.
On the Optional features screen, password hash synchronization is already checked. Select Password writeback if you have the password self-service reset option configured for Microsoft 365. Password writeback allows Azure AD to update your on-premise Active Directory user objects password if they perform a reset. Click Next.

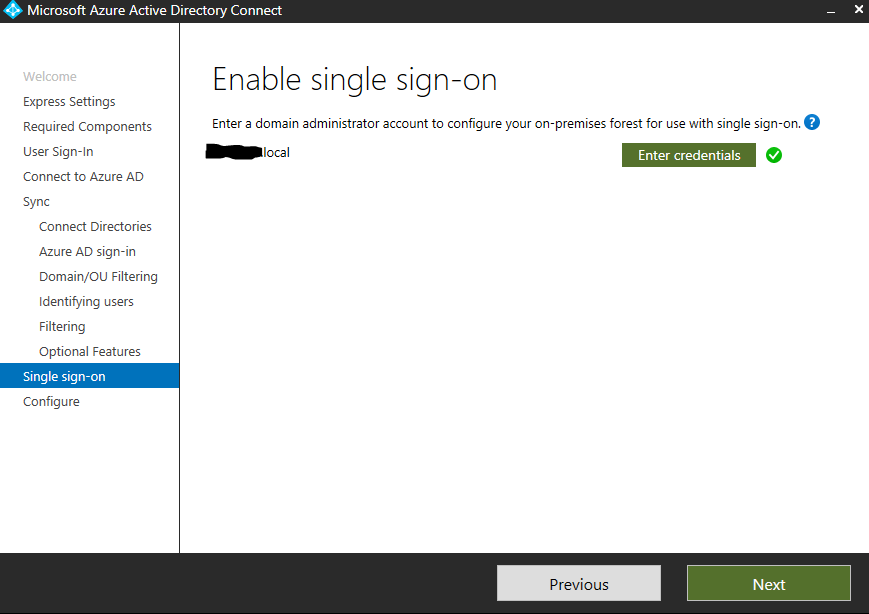
The Enable single sign-on screen already contains the credentials needed because we supplied them in the step where you connect your on-premises Active Directory to Azure AD. Click Next.
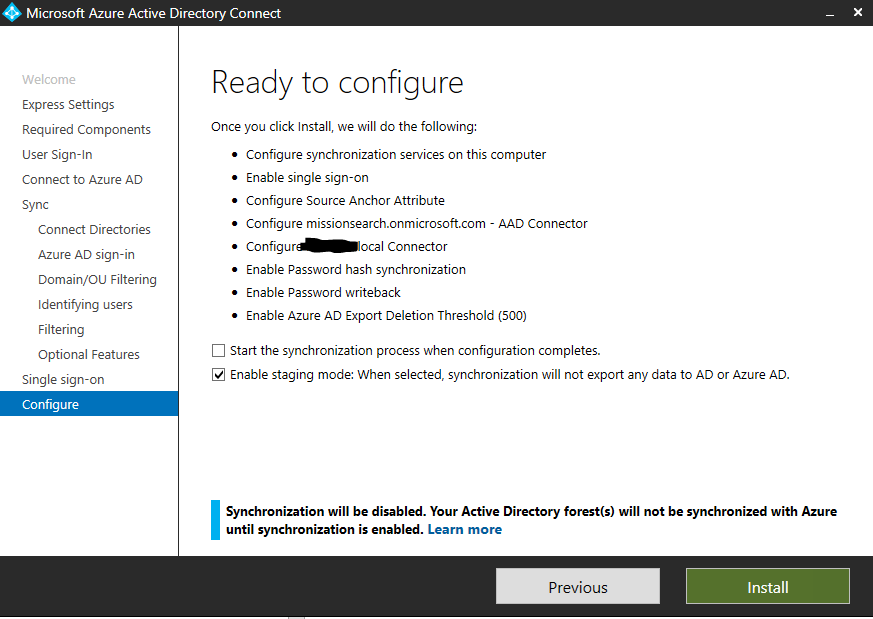
The Ready to configure screen is where we’ll make selections to put the installation is staging mode to give us an opportunity to see what would be replicated before making real-world changes. Uncheck Start the synchronization process when configuration completes, and check the Enable staging mode box. Click Install.