You can use a cache server for a small to medium-sized business no matter the industry or for whatever you would like. A DNS cache doesn’t have to be high maintenance or a menace to other people and organizations as long as you take certain precautions in the configuration.
My reasons for creating a DNS cache are:
1. I don’t trust any free public DNS
2. my organization isn’t going to pay for DNS, and
3. the DNS cache is a lot faster than Quad9, OpenDNS, Cloudflare, and all local ISP DNS server’s.
I used GRC’s DNS Benchmark program to test how long it takes for a query to be answered through our domain DNS setup which is the client -> Active Directory DNS -> Sophos UTM -> DNS server. I tested the new DNS cache server, OpenDNS, Quad9, and Google and took the average of our two internal DNS server’s. The results of the test are below, and although the differences are a couple of hundredths of a second (except for Quad9), it makes a substantial difference when you have ~1,000,000 DNS queries a day. There’s also the added bonus of increased privacy because the DNS cache server recurses to the root DNS servers.
New DNS cache server
cached - 0.000
uncached - 0.057
Dotcom - 0.021
Cloudflare
cached - 0.000
uncached - 0.077
Dotcom - 0.039
Quad9
cached - 0.000
uncached - 0.128
Dotcom - 0.091
OpenDNS
cached - 0.000
uncached - 0.061
Dotcom - 0.039
cached - 0.000
uncached - 0.069
Dotcom - 0.045
I’ve provided a VM that is in the VMDK format and consists of CentOS7 (no GUI) with BIND that weighs in at ~777 MB zipped for testing. Unzipped, the file is 10GB (total partition size). I have not changed any of the configuration settings for SSH or BIND, so they have default settings. The account used to log in, that is non-administrative, is
Requirements
1. Two static IP addresses or a single static IP address – some ISP’s allow you to use the dynamic IP that came with your account in addition to the static IP, and if you want to use two static IP addresses, you will have to purchase five.
2. A spare PC or type 1/type 2 virtualization – using a spare PC will be the focus of this article because of the low hardware specifications needed and low complexity.
3. CentOS7 which you can download from here then make a bootable thumb drive using Rufus or Etcher.
The minimum hardware specification for the server is a dual-core processor (AMD or Intel) and 2GB of memory. I tested the minimum hardware specification up to 600k queries in 24 hours, and the maximum CPU load that I observed via atop was 0.63. If you’re doing over 1 million queries every 24 hours, it won’t hurt to go with a quad-core processor and 4GB memory, but that isn’t necessary until 1.5 million to 2 million queries every 24 hours.
If you’re having qualms about using consumer hardware you shouldn’t worry. Sticking with name brands such as EVGA and Rosewill for a power supply and a small solid state drive from Western Digital or Samsung will suffice. I’ve seen consumer hardware run 24/7 for five or six years with few failures, and the failures are typically CPU heat sink fans and case fans.
Performing the following commands through the terminal is recommended, and should be done while connected to your LAN.
Change to the superuser account (enter the password you created during the operating system installation):
$ su
Adds the user account that needs sudoer privileges to the wheel group:
$ adduser -aG wheel <username>
Switch to the user that you added to the wheel group:
$ su - <username>
Test for user account sudo privileges:
$ sudo <command>
Starts the firewalld service and enables firewalld at boot:
$ sudo systemctl start firewalld
$ sudo systemctl enable firewalld
Checks if the firewalld service is running and restart the service:
$ sudo firewall-cmd --state
$ sudo firewall-cmd --reload
Changes the default zone to DMZ because only SSH is allowed inbound:
$ sudo firewall-cmd --set-default-zone=dmz
Restarts
$ sudo firewall-cmd --reload
Displays the active zone and bound interface:
$ sudo firewall-cmd --get-active-zones
Adds inbound port 53 to the DMZ firewall zone as a permanent rule:
$ sudo firewall-cmd --zone=dmz --add-service=dns --permanent
Restarts the firewalld service and displays the allowed inbound services (SSH and DNS):
$ sudo firewall-cmd --reload
$ sudo firewall-cmd --zone=dmz --list-all
The BIND configuration file in CentOS7 is located in /etc/ and is called named.conf. The options portion of the configuration file is where we will be making most of the changes. The path to the BIND configuration sample is /
There are five important points to remember when editing the configuration file.
1. You must add a space between the curly brackets and the characters that go between them or the named service (BIND) will not restart.
2. Each line must end with a semi-colon.
3. A semi-colon and space must separate values inside the curly brackets { value; value; };
4. Commenting is accomplished with /* at the beginning and */ at the end of each sentence or paragraph.
5. The default forwarders are the root servers and I don’t see a reason to change that so the forwarder parameter has been omitted.
options {
        /* This should include the private static IP address that will be accepting queries */
        listen-on port 53 { 127.0.0.1; <private IP>; };

        /* Comment out unless you're using IPv6 */
#        listen-onv6 port 53 { ::1; };

        directory       "var/named";
        dump-file       "/var/named/data/cache_dump.db";
        statistics-file "/var/named/data/named_stats.txt";
        memstatistics-file "/var/named/data/named_mem_stats.txt";
        recursing-file  "/var/named/data/named.recursing";
        secroots-file   "/var/named/data/named.secroots";

        /* The public IP must be where you will be sending queries from. Misconfiguration here can l
        ead to you and others being attacked */
        allow-query-cache { localhost; <public IP>; };
        allow-query { localhost; <public IP>; };

        /* Recursion is for cache servers only and should be turned off for an authoritative server
        */
        recursion yes;

        /* Turn on if you are going to use DNSSec aware forwarders (the root servers are DNSSec awar
        e) */
        dnssec-enable no;
        dnssec-validation no;

        bind-keys-file "/etc/named.iscdlv.key";
        managed-keys-directory "/var/named/dynamic";
        pid-file "/run/named/named.pid";
        session-keyfile "/run/named/session.key";
 };
To check the configuration file for errors run:
$ sudo named-checkconf /etc/named.conf
Start named.service (BIND) at boot
$ sudo systemctl enable named.service
Start named.service:
$ sudo systemctl start named.service
Check if named.service is running:
$ sudo systemctl status named.service
Edit the resolv.conf file and place the loopback address first and a public resolver second:
$ sudo <text editor> /etc/resolv.conf
Output that includes the server IP’s that I chose:
#Generated by NetworkManager
nameserver <private IP address of the DNS cache server>
Update the operating system and installed packages:
$ sudo yum update
If you receive a “Cannot find a valid
It’s best practice to use whitelisting for whom can connect via SSH. SSH whitelisting will be accomplished through firewalld.
Add a source IP to the DMZ firewall zone (repeat this command for as many IP addresses that you will be connecting from):
$ sudo firewall-cmd --zone=dmz --add-source=<Public IP used to connect to the server/32> --permanent
Reload the firewall so the changes can take effect:
$ sudo firewall-cmd --reload
Check that all sources have been added to the DMZ firewall zone:
$ sudo firewall-cmd --zone=dmz --list-all
We must tell the firewall to drop all packets that are not our defined source IP addresses (rich-rule):
$ sudo firewall-cmd --zone=dmz --add-rich-rule='rule family="ipv4" source address="<source IP>/32" invert="True" drop'
Reload the firewall so that the rich-rules can take effect:
$ sudo firewall-cmd --reload
The topology diagram and configuration steps are based on Sophos UTM 9.6 since that is what I have at my disposal. I created a DMZ using a whitelist firewall with ports 53, 80, and 443 to Internet IPv4 and IPv6 only (prohibits DMZ to LAN routing and vice versa) to allow for updating the operating system. I also created a destination network address translation (DNAT a.k.a. port forwarding) rule from Internet IPv4 and IPv6 to the private IP of the server for incoming DNS queries.
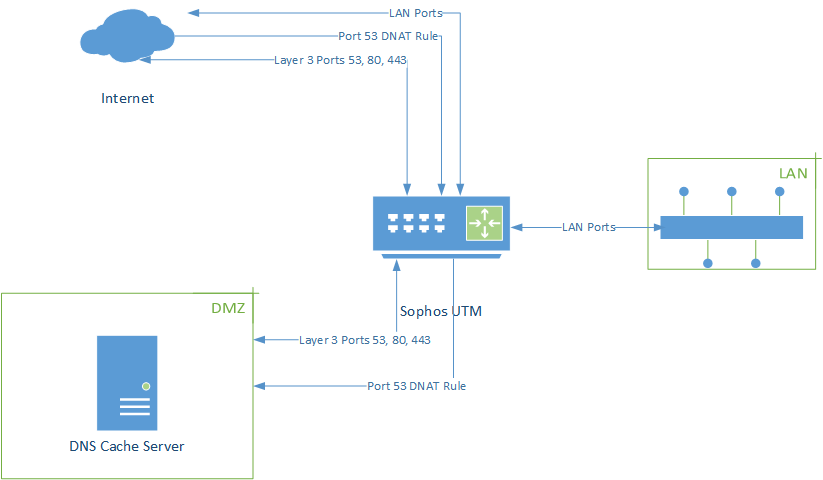
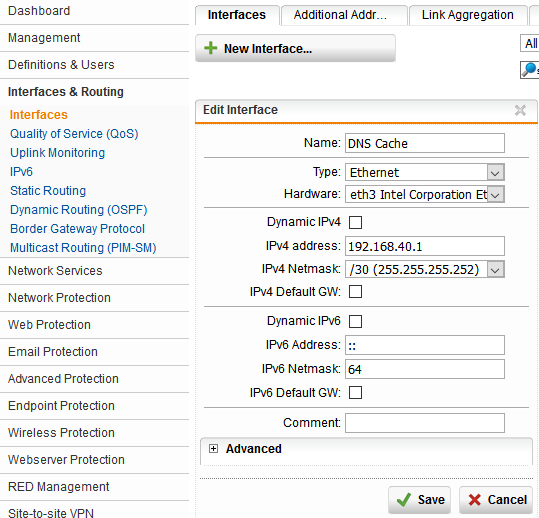
- Configure the internal interface that the DNS server is going to be physically connected to. I chose eth3 and a /30 private class C address space because I need only two addresses – the gateway and the server IP. Eth2 is labeled DMZ on the rear and front of the firewall, but I wanted to leave a space between my LAN ethernet cable and the DMZ ethernet cable.
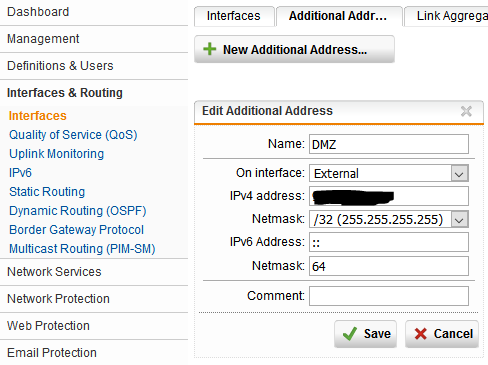
2. Create an additional address with a public IP address that isn’t in use.
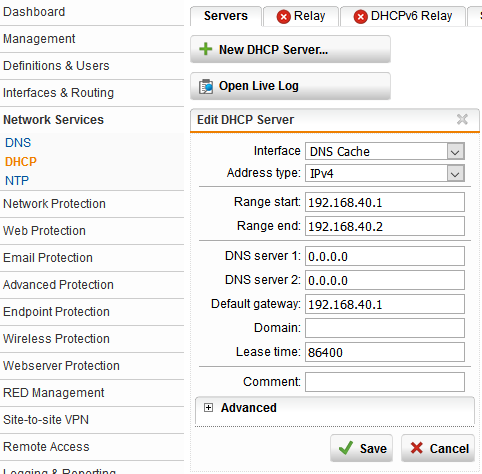
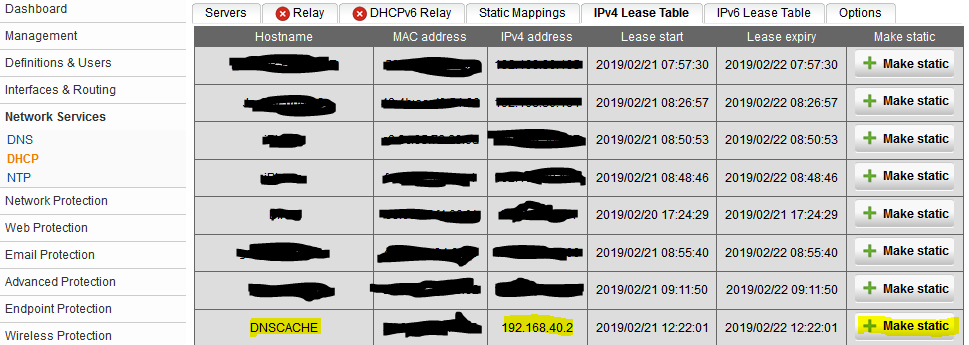
3. Create a new DHCP server that allowes for a single client IP address to be assigned. I’m going to create a DHCP reservation for the IP address that is assigned to the server (192.168.40.2). I removed the “DNS server 1” entry that was the gateway IP address because the server is going to use a list of the root DNS servers in the
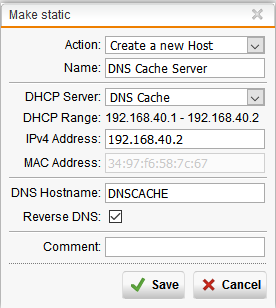
4. Before we can create a DNAT rule, we must make the DHCP reservation by going to the IPv4 Lease Table (Image 1). The server hostname is DNSCACHE. After clicking “Make Static,” a new window will appear that allows you to make a new host (Image 2).
5. Configure the layer 3 firewall rules that creates traffic flow with allowed services. Web Surfing is ports 80 and 443. Do not put “Any” in the destination box because traffic will be allowed between your LAN and DMZ.

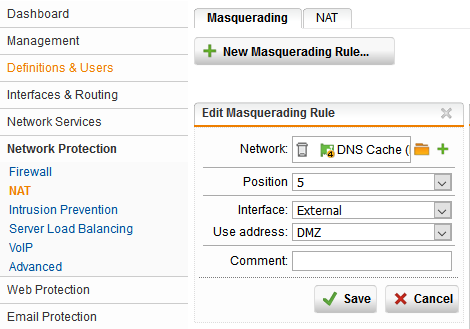
6. Create a masquerading rule to allow for address translation to make connectivity over outbound ports 53, 80, and 443 possible. This where the private address space is mapped to the public IP by selecting the address labeled DMZ that was created in the second step.
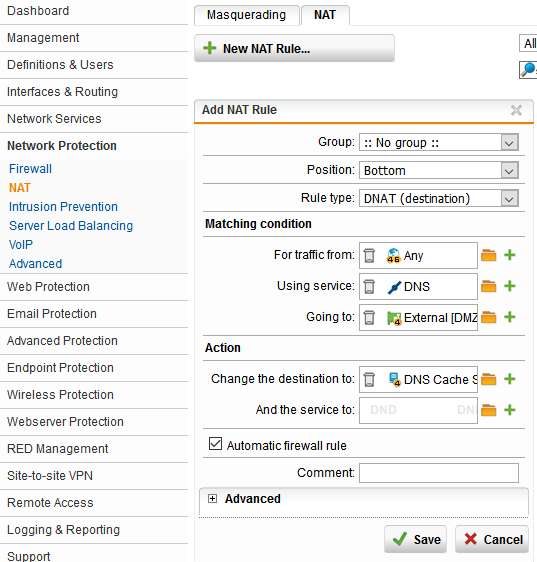
7. It’s time to create the DNAT rule that we did the preparation work for in step four by creating a new host definition. Since we have access control configured in the BIND configuration file (the public IP we will be sending queries from), and our LAN and DMZ are allowed to communicate with internet IPv4 and IPv6 addresses only, we can leave the “Any” address object in the “traffic from” box (Image 1). Make sure to select “Automatic firewall rule.” A DNAT rule for SSH must also be created so we can administer the server.
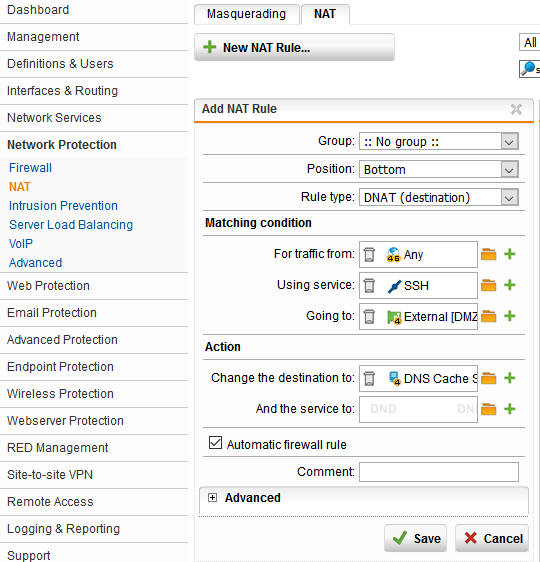
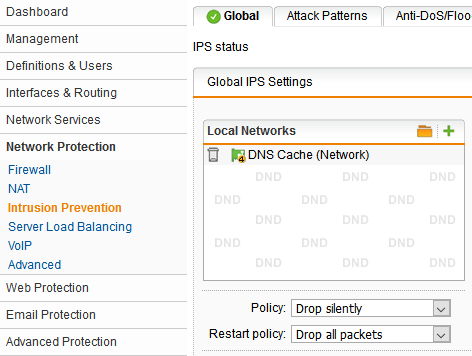
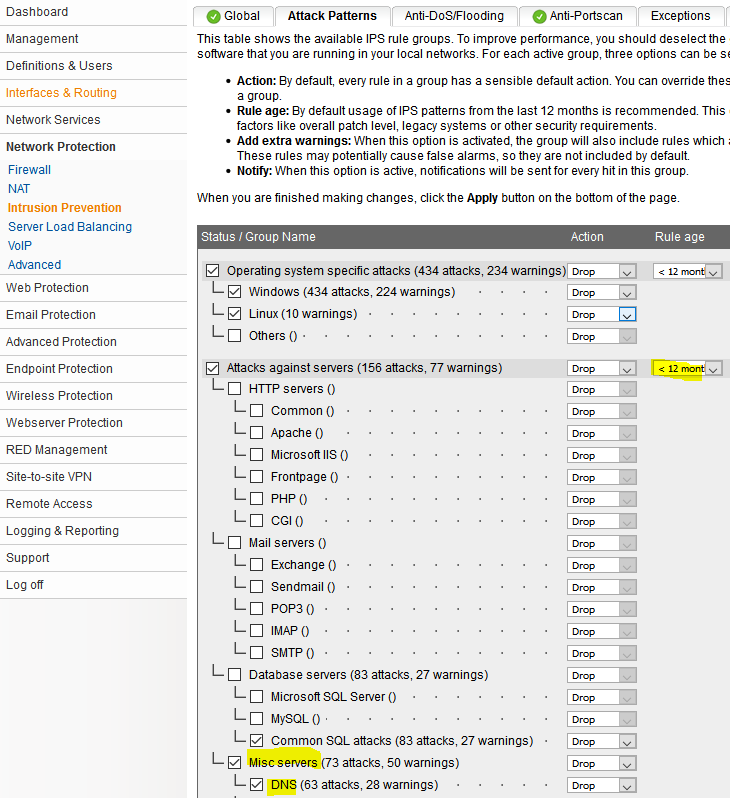
8. Last, but certainly not least, enable the IPS for the DNS cache network (Image 1), and make sure DNS under “Misc servers” and 12 months and newer rule age is selected (Image 2).
Connect the DNS server to the firewall. Change the DNS server used by the firewall for forwarding to your new DNS server by creating a new network definition using the green plus symbol.
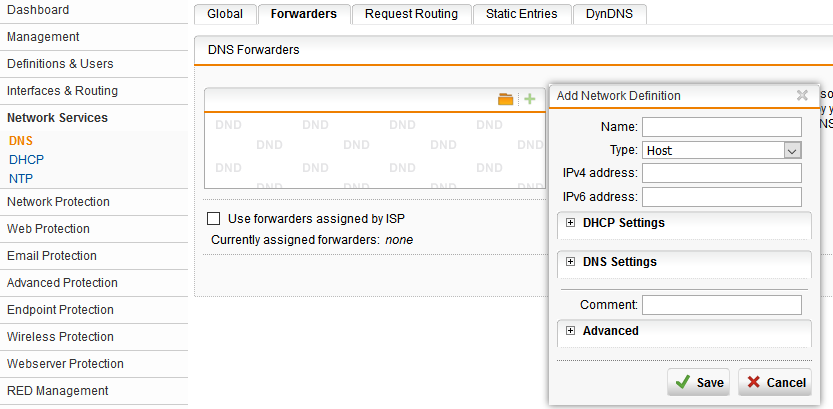
Next, create a name for the definition such as DNS Cache Server and enter the public IP address in the IPv4 address box. “Type” will remain as host, click “Save,” then click “Apply” and you are now using your private DNS cache server.
Test the rich-rule that was created for SSH whitelisting by trying to connect to the server via SSH from an IP address that was not defined as a source IP. I used an SSH client on my phone.
Troubleshooting notes:
1. CentOS 7 wasn’t scaling the processor frequency above 1.4GHz (FX-8320E at 3.2GHz). I went into the BIOS and disabled the C6 State and Cool ‘N Quiet then used “$